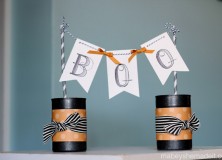
Last year around this time I had the chance to be a contributor over at While He Was Napping, and this was one of my first posts. I LOVE watercoloring, and this was a fun way to add a little Halloween flare to some really simple watercolors. So today I’m bringing home the Halloween Boo Cans.
++++++++++++++++++++++++++++++++++++++++++++++++++++
Hi there! I’m Lisa Mabey and I blog at
Mabey She Made It about
DIY projects,
crafting, and sewing. I’m excited to show you a little Halloween project today that would be really cute by your candy bowl or on a little shelf that you’re decorating for Halloween. Not only is it simple to do, but it’s made from things you probably already have around: straws, string, patterned paper, empty soup cans…
I don’t know about you, but I don’t personally care for the creepy, spooky, or macabre elements of Halloween. My Halloween style is typically lighter and more fun since I tend to ignore the darker side of the holiday. The Halloween Boo Cans showcase that preference, and I hope you like it as well!
Halloween Boo Cans Supplies
Instructions:
- I’ve been really excited about watercoloring lately, and gray watercolored letters seemed perfect for Halloween. I started with three pieces of watercolor paper (2-1/4″ x 3-1/2″) and sketched a letter onto each one. For my letters, I found a fancy font I liked (I used FoglihtenNo04) and freehanded the shape of the letters with a pencil. If you didn’t want to freehand, you could easily print your word and copy it onto your paper though.

- Once you’ve got your sketch, it’s time to start painting! I use water-based dye ink to watercolor with, but watercolor paint would (obviously) also work. If you do use a water-based dye ink, you may want to use gray instead of black. Gray ink stays gray when you dilute it with water, but black ink may come out purple if you watercolor with it.
- Start on one side of each letter, and work your way to the other side so that the color is darker on the same side of each letter. Blend until you like the results, and let dry. Now erase all your pencil marks.

- You can either leave it like that, or outline the letter with a fine-tipped marker. I liked the definition the outlining gave since the gray was pretty light on the far side of each letter.

- Then cut each piece into a pennant shape, punch a small hole in the top corners, and thread some baker’s twine through the holes to create your pennant banner. To keep the ends of the baker’s twine together so it’s easy to thread, put a little glue on your fingers and twist the twine “tighter” and let it dry. It’s fabulously easy to thread once the end is dry.

- Then punch holes in the tops of gray striped paper straws and tie the baker’s twine to the straws. You now have the pennant banner part complete!

- Paint two cans black, and let them dry. I used a black metallic paint, so it’s a bit sparkly.

- Then adhere patterned paper around the cans and finish with some wide ribbon.
- Now fill them with candy and stick the pennant banner into the cans to display wherever you need a little Halloween cheer! This would be really cute as part of a vignette or with a small candy dish in front of it.

I hope you’ve enjoyed making these Halloween Boo Cans with me, and that you’ll come visit me at
Mabey She Made It for more craft ideas, DIY projects, and sewing!







I'd love to hear your thoughts–leave me a comment!