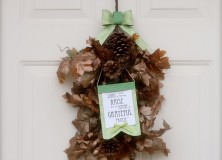
Here’s another fun way to create a unique and fun door for the Thanksgiving season. I created this last year for a guest post at Gingersnap Crafts, and never posted it over here (I was in that morning-sick-phase where nothing could motivate me to get moving). But I’m glad to be able to share it with you this year!
+++++++++++++++++++++++++++++++++++++++
Good morning! I’m Lisa Mabey from Mabey She Made It where I blog about DIY crafts andsewing. I’m thrilled to be here sharing my Grateful Praise Door Hanging today.
One of the things I love about creating is making beautiful and usable things from the not-so-beautiful-or-usable. I also love it when I can find clearance or thrifted items to use so that my overall expense is much less. Such is the case for today’s Grateful Praise door hanging. Let’s make it together!
I started with some clearanced fall leaves that I got for 90% off. Right now I’m sure you could find them everywhere since stores are putting up their Christmas displays and getting rid of Halloween/Fall items. I liked several elements of the arrangement, including the pine cones and acorns. What I didn’t love was the color and the quality of the leaves. They just looked fake (I know, they are) and I wanted a more chic gilded look.
So lets start with a coat of spray paint in a muted copper color. This gives it a classy metallic sheen and somewhat covers the poor quality. Give it a couple of coats, and be ready to find lots of hidden spots! Those leaves bunch up and can be a little tricky, but it’s not too bad. Or, if you want, you could do a single light coat to mute the color but still have it peek through–I think that would also be beautiful.
Now that it’s one solid color, lets introduce a little interest. I’ve been thinking about Thanksgiving a lot lately and wanted to catch the spirit of gratitude and giving thanks, so I chose to print some lyrics to the hymn “For the Beauty of the Earth.” Incidentally, this hymn makes me think of the movie Little Women and about how grateful I am for my own four sisters (and brothers, too) so I love that it reminds me to be grateful generally and specifically.
After printing and cutting your quote out, adhere it to some double-sided patterned paper leaving a wide border on the sides and lots of space on the top and bottom. Fold the top edge down (but don’t adhere it yet) and cut tails from the bottom edge like this:
We’re going to be tying this banner to our leaves, so get a long piece of string or ribbon and place the center of it under the top flap. Now adhere the flap down. Curl the bottom tails of your banner, and add a little bow.
Now just tie it to your leaves and nestle the whole thing in a little until it looks cozy.
Now we’re going to make a bow out of the same double-sided paper. Cut a strip (mine was 1-1/2″ x 9″) and fold it like this to create the top of the bow.
Staple it in place, then cut out grooves in each side to make it look rounder.
Cut two more strips of paper (about 1-1/2″ x 6″) to make the tails of the bow. Cut notches from the bottoms, and bend/curl them into a wave. Staple them to the back of the bow. Now take a third strip (a little narrower) and wrap it around the center of the bow and adhere to hide your staples and different pieces.
Add it to your leaves, and you’re ready to display your Grateful Praise Door Hanging!
I hope you’ve enjoyed making this Grateful Praise Door Hanging with me, and that you’ll come check out some of my other projects over at Mabey She Made It and follow me on Facebook,Twitter, Pinterest, and Instagram!


I'd love to hear your thoughts–leave me a comment!