So last week I was able to go to my first blogging conference (SNAP!) and it was amazing. I worked on updating my business cards, got them printed, and was happy with how they turned out. But I knew that I wanted to do something a little special with some of them.
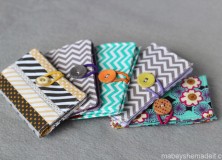
I’d also been wanting to try out this business card holder tutorial by the Crafty Cupboard for a while now. And they didn’t seem to involved so I made up about 22 of them–for my roommates, myself, and some extras for handing out when the moment struck me.

They were pretty fun to make, actually, although when you make 22 it takes a while. I followed Melanie’s tutorial as is except that I wanted to add a little label to the inside of each one that would remind the recipient of where they got it from. So after hemming the pocket pieces I added the labels.

For the labels, I designed a little logo with “Mabey She Made It” on an aqua background (like my blog header) small enough to fit on 3/8″ taffeta ribbon and repeated it until I had enough labels. Then, you flip your image so it’s mirrored, print it on transfer paper (but NOT on a laser printer). Cut those little labels out, iron them onto your ribbon, and then cut and sew the labels onto one of your pocket pieces, leaving room for seam allowances.

I really like the little added detail they give the finished product. They’re simple and not overwhelming, but they are branded.
I won’t get into how much fun it was to hand them to a few sewing bloggers that I admire though…I’d get all sappy. But you know what? I didn’t bring enough of them with me on the first day (and I didn’t have a good plan for who I wanted to give them to) so I have a few extras.
Would you like one? Let’s do a giveaway for three of them! If you’re in the US, feel free to enter!

a Rafflecopter giveaway



I'd love to hear your thoughts–leave me a comment!