This post is sponsored by Plaid, but the experience and opinions are 100% mine.

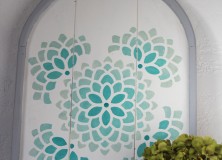
Have you ever seen something and known it was meant for you? The moment I saw this arch, I knew it was mine–it just needed a little makeover! I have a definite passion for arches and I knew a contemporary design would make the shape shine. When I saw the Stencil1 stencil and FolkArt Multi-surface paint (which is good for indoor, outdoor, and even in the dishwasher!), I knew they were going to be the perfect complement for my beloved arch, which is fairly large and needed a bigger design. I also loved that I could repeat and layer sections of the stencil to make the piece larger–I’m thinking walls or floors would be awesome with this design.

And while I was super excited to get started, I knew a little planning was going to save me a lot of headache in the end. So I took some paper and made a template of the arch area so I could plan and practice before getting to the arch. I took a pen and traced the areas to get an idea of placement and the size of section I’d want to repeat. As you can see, it’s a bit of a mess as I played with a couple of different configurations before I was happy. I also played with the actual stencil and getting the ombre effect on my practice sheet. I found that although I had a stencil brush, I much preferred using a sponge dauber for a smoother finish (and it was faster to get the coverage I wanted).

One more thing I’m glad I did was to mark the section I’d be repeating with a permanent marker before getting started. It saved me from getting lost!

Once I was happy with my plan, I got started.
First, this countrified arch needed a little help. See that house and trees? Yea, they were glued and nailed on and had to come off.

Then I needed to sand to make it smooth. After that, the inside got a couple coats of white paint and the frame of the arch got some gray paint for contrast. Once that was dry, I was ready to start stenciling!
Here’s how to do it:
- Find the center of your space. Since mine was arched at the top, I actually started about 1 inch lower than center because the bottom would be visually more heavy because of the shape, but if your space is symmetrical, I’d start in the center. Lay your stencil where you’d like and start in the center with your color of choice (mine was Teal). Stencil the center by dipping your dauber (or brush) in a bit of paint, then wiping most of it off on a paper towel or your palette. Dry is good when stenciling so you don’t get gobs of paint seeping under the stencil.

- For each layer of petals, I added a bit more of my Parchment color to lighten the Teal and get the ombre effect. I also found it easy to get lost, so sometimes I’d put a little spot of color in the petals I was filling with that particular shade.

- Just work your way out now, until you’ve completed all the petals on the stencil. Let the paint dry.

- Now, find the spot where you’d like to start your repeated pattern and place your stencil again. Using the marked spaces only, stencil from the center out, using the same ombre effect.
- Repeat 3 more times, making sure your pattern is evenly spaced (just a hint: I left 5 empty “spaces” between petals between each repeat, and it worked out great).

- Let the whole thing dry while you’re cle
 aning off your stencil (it’s made of sturdy mylar and can be cleaned for additional uses).
Now you’re ready to show it off! Your stenciled arch is one-of-a-kind and fabulous.




I'd love to hear your thoughts–leave me a comment!