
*This is a Sponsored post written by me on behalf of I Love to Create for Blueprint Social. All opinions are 100% mine.
When you think of summer, I’m sure a lot of things come to mind–long days, popsicles, shorts, and summer crafts. And you know that those summer crafts often include tie dying. It’s a fun way to create and it’s perfect for doing outside. But if your idea of tie dye only extends to t-shirts, you’re missing out on some cool things you can do! The Tie Dye Your Summer theme got me thinking about other creative ways to use tie dye.
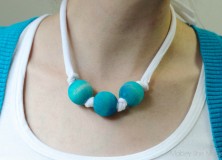
Using Tulip One-Step Tie-Dye (America’s favorite tie dye) and all these fun colors, we were able to make some traditional t-shirts AND some unexpected tie-dye necklaces.
And while my girls loved being able to add lots of colors, I kind of stuck to one color per piece. But that’s what makes tie dye so much fun–it’s so individualized that every project is different and yet it’s simple enough that you can even help your two-year-old design her own!

Today I want to share a couple of necklaces I created using these beautiful bold colors, so let’s get started!

You’ll need:
- T-shirt strips
- Tulip Tie Dye
- Wooden beads
- Thin cotton rope
Let’s tie dye!
- Cut a strip of a washed and damp t-shirt about 1-2″ wide and as long as you can (you can trim any excess later).
- Decide whether you want your knit dyed or kept white. If you’re dying it, saturate the strip with prepared dye (just add water to the bottle–it’s so simple!) and let it sit. Then rinse and let dry.
- To dye the beads, place some dye in a cup, and let the beads soak up the dye until it reaches your desired hue. Then take them out of the dye, rinse, and let dry.

- To create the t-shirt necklaces, place one bead in the center of your strip and tie a knot on either side of the bead. Continue adding beads and knotting in between as much as you’d like. To wear, simply tie it around your neck!

- To create a nautical necklace, take three pieces of thin cotton rope about double the length you want your necklace. Tape the ends together so you can thread your beads on. Place your center bead in the middle of your rope, and tie knots between beads like before. Then, when you have your desired beads, braid the ends and tie a knot in each end.

One thing I loved doing was creating my own color. I wanted a navy blue dye, so I mixed blue and black until I had the right color, but you could mix any of the dyes to create custom colors. I love how fun and trendy this necklace turned out and knowing that the dyes are permanent and color-fast, I don’t have to worry about them running or fading.
If you like these ideas, you can find more from I Love to Create on Facebook, Twitter, Pinterest, and on their Blog.
To see other fun tie dye projects, check out any of these links below!



I'd love to hear your thoughts–leave me a comment!