Have you ever met someone you just instantly liked? Stephanie is one of those people for me. She’s kind and gracious, amazingly talented, and beautiful to boot! And in addition to meeting her at a conference, I also got to hang out with her for an evening a few months ago. And she’s one of the co-hosts for the Do Tell Tuesday party (go link up!) as well. So I’m turning you over for the day…take it away Steph!
+++++++++++++++++++++++++++++++++++++++++++++
Hi everyone–I’m Steph from Crafting in the Rain. I’ve gotten to hang out a bit with Lisa twice this year. And since you read her blog, you obviously think she’s fab like I do 🙂 I’m happy to be taking over here for the day.
Supplies:
- White kitchen towel
- Fabric paint (tan and dark brown….you can also buy a bottle of fabric medium and mix into acrylic paints you already have)
- Brush
- Freezer paper (found near wax paper and foil in stores)
- Iron
- Ribbon or trim, optional
Instructions:
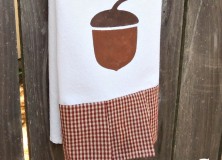
- Make the freezer paper stencil by cutting out the acorn shape (download the acorn svg here) Put the dull side of the freezer paper down on the sticky mat, making it shiny side up.
Cut and peel stencil up from the mat. - Flip it over so it’s shiny side down on the towel and press down with medium heat iron. This makes the stencil stick to the fabric.

- To prevent bleed through place a piece of cardboard or freezer paper under the towel. Paint tan on the bottom part of the acorn, and dark brown for the cap.
- Peel up the stencil and let dry completely. Follow instructions from the fabric paint (some suggest a drying length, other suggest setting the paint in the dryer, etc.)
Leave it just like this,
or add a bottom trim by sewing a piece of another towel in a different color onto the bottom.
Which way to do you like better?
If you want some more freezer paper ideas, check out these posts:
Witch hat pillow
Mickey flag shirt
Drawstring toy bags
Thanks for having me Lisa!!
~Steph


I'd love to hear your thoughts–leave me a comment!