
Have you seen some of the fun foam mannequin head projects going around? I’ve been loving all the ways my blogging friends have been using them, and so I was excited when I got to take the challenge too! I was immediately drawn to the female head because of the feminine features when my box of heads came.
Using a FloraCraft® Foam Head, I wanted to make something for my girls’ room. It’s been undecorated ever since we refinished the room 5 months ago. I’ve had some fun ideas, but no time to work on it with the fall rush. So the arrival of my foam heads was just the motivation I needed to get to work.

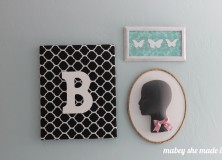
I had a vision of creating a cute little silhouette for the girls’ walls. That idea morphed into more of a cameo as I got started though. And honestly-I love how it turned out.
Here’s how to make one!
Cameo Supplies:
- FloraCraft® Foam Head (available at Jo-Ann Fabrics and Michael’s)
- Foam board
- Chalk paint
- Rope
- Gold spray paint
- Glue gun
- Ribbon
- Electric knife
Instructions:
- Cut your foam head in half so you get two profiles. This is a bit tricky, but I used an electric knife and some patience and got the job done. It’s also messy, so do it outside or over a garbage can if possible. Make the back as flat as possible, but it doesn’t have to be perfect.
- Paint your foam head using two coats of chalk paint, and let dry. Adhere a bow to your head.
- Cut an oval from your foam board. I traced an oval serving tray and used a craft knife to cut.
- Since cameos typically have a decorative border, paint a piece of rope that’s long enough to go around your foam oval with the gold spray paint.
- Glue the head to the center of the foam oval, and glue the rope around the perimeter.
- Glue a loop of ribbon or rope to the back for hanging.
Then I hung it above Brynley’s bed, and I love how it instantly makes the room girly and fun. 
And since it’s super light, I don’t have to worry about it falling on them in their sleep.




I'd love to hear your thoughts–leave me a comment!