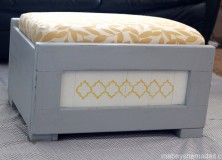
The other day I ran across this ottoman at our local thrift store for $8, and since I’d been wanting an ottoman for our living room couch, I stopped to check it out. It was old and outdated, but it was well-built and I wanted it. So it came home with me.
First up, I knew it needed a paint job. I used the Americana Chalky Paint in Yesteryear and Everlasting (that I used on my Stenciled Arch and on my Thrifted Chair Makeover) to give the whole thing a gray coat. Then I painted the insets with the White. I let it dry, then flipped it over and added some felt pads to the bottom of the legs so they wouldn’t scratch anything down the road.

After sanding a little, it was time for a little detail. I printed out a pattern then scribbled with chalk all over the back of the paper. Then, I laid the paper over my detail area, and traced the design, transferring the chalk onto the ottoman.

After that, it was time to handpaint the design onto the insets (there is one on each side of the ottoman). I used a mustard color of acrylic paint, and just painted inside the traced lines I’d made. It was harder and easier than I expected. Harder because some of the pattern rubbed off as I was working, but easier because it was just like coloring inside the lines.

After a wax coat, the ottoman makeover itself was done!
I still needed to recover the cushion though. I used a home decor fabric I picked up in California, and I love how the leaf pattern works with the painted detail to create interest without being too busy. It’s even a zippered cushion cover, so I can remove it and wash it as needed. LOVE.

And once it was all put back together, I couldn’t help but do a happy dance. I love it so much.

And now when I’m sitting on my couch, I can put my feet up on something fun and completely my style. Just ignore the chipped toenail polish–it’s getting harder to reach those toes these days. 🙂


I'd love to hear your thoughts–leave me a comment!