 You probably came after seeing the butterfly tunic on Pinterest and I’m so glad you’re interested in making your own. The great part is that its easier than you think and I’ll walk you through it.

![]()
Through this post I’ll show you
- How to prepare the butterfly
- Tips for choosing a tunic (and the pattern I used)
- How to fit it to your model
Sometimes your creations take on a life of their own–that was absolutely the case with the butterfly top.
When I was asked to take a Square by Design square (available only at Jo-Ann Fabric and Craft Stores) and turn it into something fun, I thought about how I could make it really special.
The butterfly was meant to flit and fly. I couldn’t really see it coming to life as a pillow or wall hanging, but if I were to put it on a little girl, that butterfly could soar. And it really does.

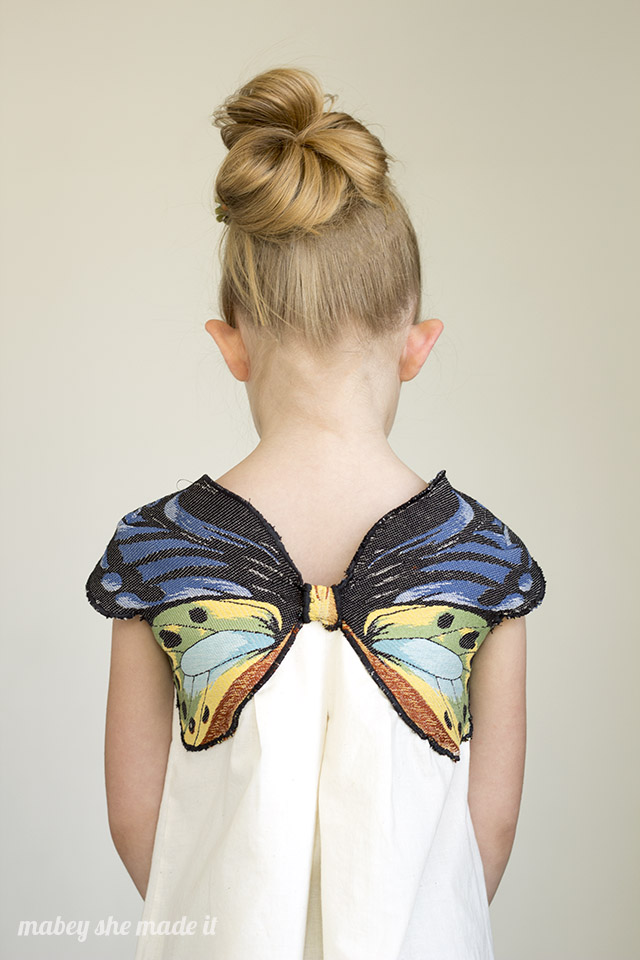
Sewn to a simple, elegant muslin tunic, the butterfly shines. It’s eye-catching and beautiful, especially since you don’t really expect it from the front. But turn around, and the butterfly top stops people in their tracks.
Choosing a Shirt or Tunic
Put this tunic on a little girl, and she won’t stop moving. Saige danced, and flapped, and transformed into a graceful little thing flitting around the house for hours. And every time she floated past, it put a smile on my face and part of that was pairing the butterfly with the right tunic.


This design is really versatile, and you can add the butterfly to a purchased top or tunic if you want. Whether you want to make or buy your tunic, here are the features to look for:
- A lower back so your tunic isn’t peeking out above the butterfly
- No back closures
- A neutral color, preferably white or ivory. I used this natural muslin and love it.
- Cap sleeve (or sleeveless) since the butterfly wing creates a little cap sleeve and you don’t want sleeve hanging out
I made my butterfly top using the McKenzie Tunic from Shwin Designs. I chose this pattern because it had the things listed above plus a square neckline and box pleats that I could manipulate to mimic wings. Your tunic doesn’t need these additional features, but it’s something to think about.

Here’s the front of the McKenzie tunic before adding the butterfly, and I wouldn’t change a thing about it–its the perfect pattern for this project.

So grab a Square by Design butterfly and your shirt or tunic, and let’s get started!
Instructions
- Carefully cut around the butterfly, leaving a little bit of the background. Once cut, the edges will want to fray a lot, so try not to handle it too much. I cut off the head, but left the body with the wings–I’ll show you why in a bit.

- Using black thread, stitch a tight zigzag all around the cut edges to keep them from fraying. NOTE: I tried this with my serger, and don’t really recommend it because of the details and curves. I ended up fixing it with my sewing machine.
- Put the tunic on your model, and start pinning your butterfly. Start by pinning the lower wings under the arms lined up with the side seams then work your way up the butterfly, pinning as you go. (For fitting tips, see the next page.)

- Pin the tips of the upper wings over the shoulders–they’ll create a bit of a cap sleeve when they’re wrapped. You’ll notice you have a big gap on the top of the shoulders at this point, so pinch and pin the excess so it lays flat to the shoulder.

- Now that you know where everything goes, lightly mark where the front wings are and unpin them from the front. Create shoulder darts by taking the pinched excess on top of the shoulders and flipping the excess inside out so the right sides are together and sew a wedge from the edge in as far as your excess goes. It will look like this when you’re done and will create a curved shoulder/sleeve.

- Take the butterfly’s body, and wrap it around itself and tack it in place on the back side of the butterfly. You could choose to leave the body and sew it in place alternatively.

- Press your darts well, then sew your butterfly to your top/tunic along the butterfly edges and the tunic’s neckline.

Fitting the Butterfly Top

Since you’ll be starting with a tunic that fits, that part will already fit. This top was approximately a 5T (ready to wear sizing) and the butterfly fit perfectly. Since you may be making a different size, here’s my recommendation:
Smaller Sizes:
- You will be wrapping the butterfly around the tunic a little more, so instead of starting to pin from the side seams, I’d start from the center and smooth the butterfly around so you know how much further you’ll need to wrap the lower wings.
- You’ll need larger darts and will have more of a cap sleeve and wing showing in the front.
Larger Sizes:
- You will be wrapping the butterfly around the tunic a little less, so instead of starting to pin from the side seams, I’d start from the center and smooth the butterfly around your model so you know how far the lower wings will extend to the side. Depending on size, there will be a gap between the lower wing and the side seam.
- You’ll need smaller darts and you won’t have as much sleeve or wing showing in front.
TIP: You can find the Square by Design fabrics in the home decor section at most Jo-Ann stores. If you can’t find them in your store (not all locations carry them) you can always find them online here.

This idea would be perfect for a Halloween costume or (like at our house) any time at all.
I hope you try the butterfly top for yourself–its an easy way to make a beautiful creation that you’ll love!



I'd love to hear your thoughts–leave me a comment!