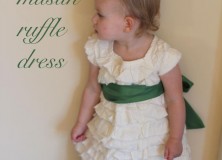
I don’t know what it is, but I love muslin. I especially love it ruffled and frayed a little. From this love came the Muslin Ruffle Dress.
I actually made this dress when Saige was little, but it never fit her quite right. I realize now it was just too big when I was putting it on her so now that Brynley is bigger, it’s fitting really cute. So I thought I’d show it off a little and tell you how I made it, even though this isn’t a proper tutorial.

I started by tracing a dress that already fit to create a front and back. It was a basic A-line dress with raglan sleeves. Once the basic dress was cut out, I started ripping long 2″ pieces of muslin to ruffle. Note: I ripped it on grain, but you may want to use bias strips so that there isn’t as much shedding. After a few washes, it doesn’t lose much, but I do pull a thread or two each time she wears it.
After ruffling all the pieces, I started pinning them to the dress front and back. I started at the bottom and worked my way up, making sure to overlap the rows of ruffles by at least 1/2″. Also make sure that your front and back ruffles match at the seams. I also added a couple rows of ruffles to the sleeve pieces.
After that, it was time to sew all the muslin ruffles to the dress. It takes a while…
Then you can sew the sleeves into the dress and sew up the side seams. I made some bias tape from another piece of muslin and used it around the neckline and back closure. Add a button closure, and you’re practically done. (Hurray for things that don’t need hems!)

I then created a long green sash to tie around the dress and add some color. My kids are pretty fair, so the pop of color was really needed. A mocha or champagne sash would also be really chic.
The Muslin Ruffle Dress is really versatile, and I love that a little change (like the sash) can create a different feel.


I'd love to hear your thoughts–leave me a comment!